Last week, a client asked me to add an llms.txt file to their Framer site. Simple enough, I thought. I searched for a guide, found four of them, and every single one pointed at a settings panel that is not there anymore.
"Go to Project Settings, scroll to Well-Known Files," one said. Another said "Site Settings, SEO panel, Advanced SEO." A third confidently declared that robots.txt "cannot be edited" in Framer and suggested a Cloudflare Worker workaround instead.
None of it matched what I was looking at on screen.
Here is what actually happened: Framer launched a Static Files feature on March 23, 2026. It moved well-known file uploads into a dedicated Files tab inside the Domains section of your workspace. Every guide published before that date describes a workflow that no longer exists.
This article is the current workflow. I took these screenshots from a live dashboard this week. And because both files now live in the same tab, I am going to cover llms.txt and robots.txt in one pass instead of making you read two outdated articles.
Already know what an llms.txt file is? Skip ahead to the upload steps.
Key Takeaways
As of 2026, you add a custom
llms.txtorrobots.txtfile to a Framer site via the Files tab under Domains in the Framer workspace, not via any settings panel.Framer's Static Files feature launched on March 23, 2026. Guides published before that date describe an outdated workflow.
Uploading well-known files requires a paid plan. Framer's documentation currently lists different tiers on different pages; check framer.com/pricing for the current plan gate.
llms.txtandrobots.txtuse the identical upload mechanism, so adding the second file after the first takes about 60 seconds.Framer auto-generates a default
robots.txtfor every published site. You cannot edit that default in place, but you can override it by uploading your own through the Files tab.After uploading either file, you must publish your site for it to go live. Verify by visiting
yourdomain.com/llms.txtoryourdomain.com/robots.txtin a browser.
What an llms.txt File Actually Is
An llms.txt file is a plain-text file hosted at the root of your domain that gives AI systems a curated list of your most important pages. Think of it as a guided tour for language models and AI agents: instead of letting a crawler infer what matters on your site, you tell it directly.
The format is defined at llmstxt.org. It is intentionally minimal: a short description of your site, then a list of the pages you want AI systems to prioritize, written in Markdown.
One thing to get straight before we go further: llms.txt does not replace robots.txt. They do different jobs. robots.txt controls which crawlers can access which parts of your site. llms.txt curates content for AI reading. You can have both, and on most Framer sites in 2026, you probably should. For the full strategic case on why this matters for search and AEO, I covered it in depth in my Framer SEO playbook for 2026.
Why the Old Guides Are Wrong (What Changed in March 2026)
Before March 2026, Framer handled well-known files through a dedicated section inside Project Settings or Site Settings, depending on which version of the UI you encountered. Some older interfaces had it under an "SEO panel" inside Site Settings. The feature was plan-gated and, depending on when you looked, the robots.txt page was documented as auto-generated and uneditable.
That all changed on March 23, 2026, when Framer shipped Static Files. The feature consolidated well-known file management into a Files tab sitting inside the Domains section of your workspace. The same tab handles llms.txt, robots.txt, security.txt, and any other static file you want to serve at a root path.
The practical consequence: every guide that mentions "Project Settings" or "Site Settings" or "Well-Known Files in the SEO panel" is describing a workflow that may no longer match your screen. The current path is Domains, then your domain, then Files. That is it.
Even Framer's own documentation has some catching up to do. As of this writing, the dedicated robots.txt help page still describes the file as auto-generated and not directly editable. It was last updated one day after Static Files launched, so it appears to predate the consolidation. The well-known files page and the llms.txt-specific page both reflect the new Files-tab workflow.
How to Add an llms.txt File to Your Framer Site
This is the current workflow, confirmed from a live Framer dashboard. The file-upload interface lives under Domains, not anywhere in the site settings.
Before you start: you need a paid Framer plan. The well-known files help page and the llms.txt help page currently list different plan tiers, so I would recommend checking framer.com/pricing directly to confirm what is included in your plan. This is the one fact I could not resolve with certainty at draft time; see the delivery notes at the end.
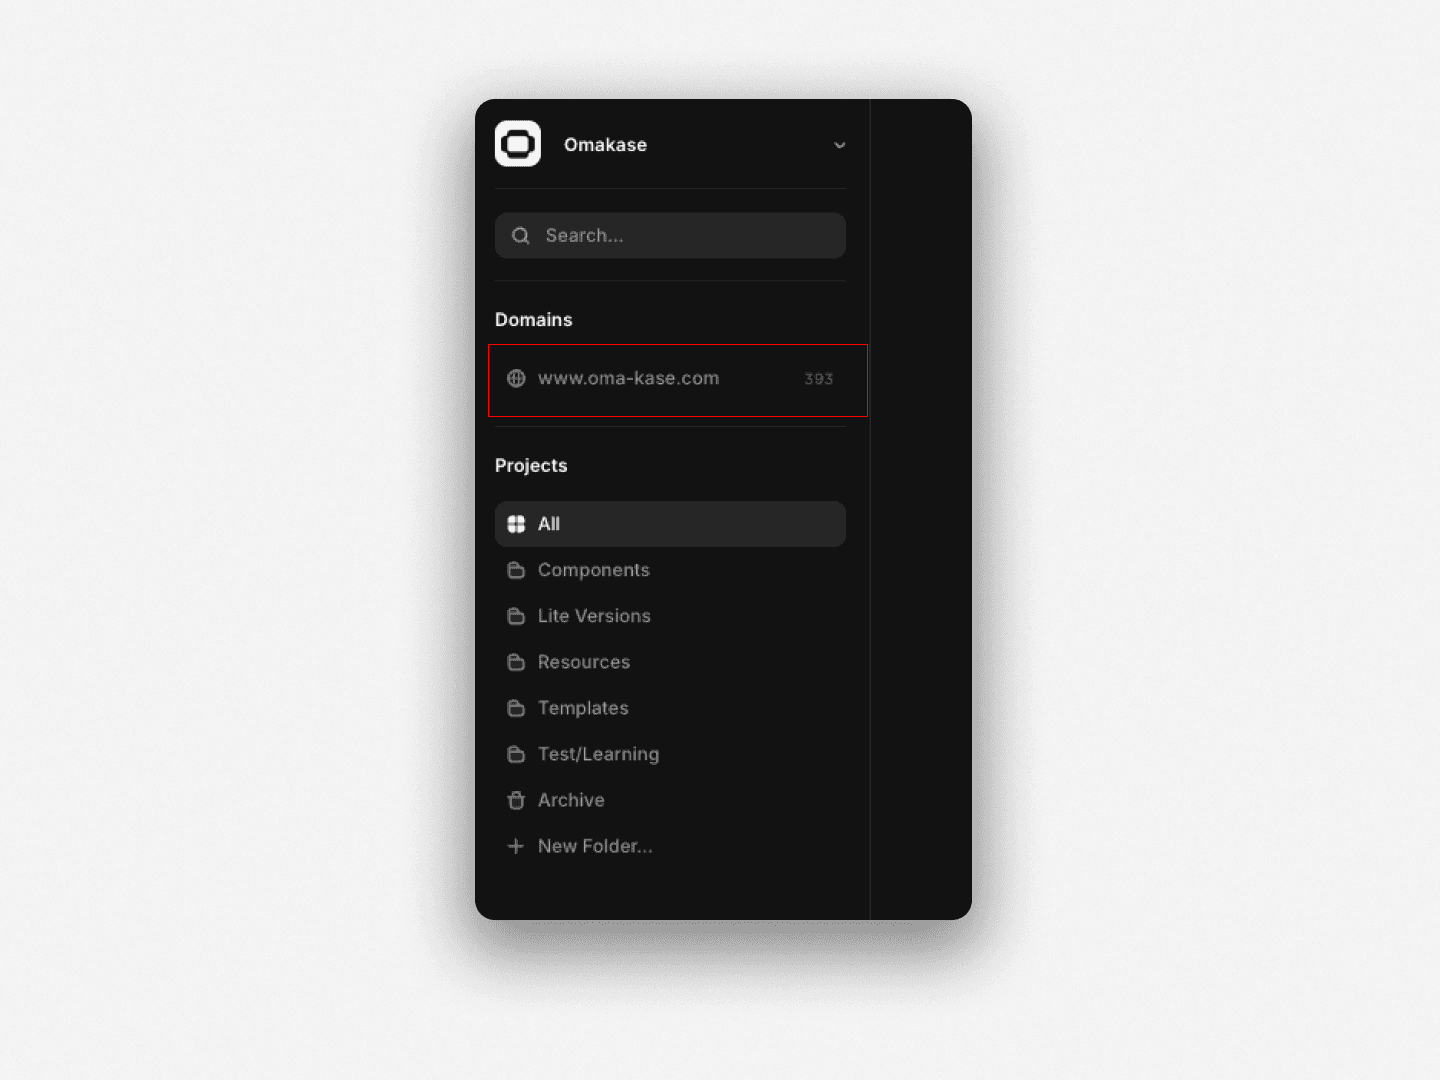
Step 1: Open your Framer workspace and click your domain.
In the left sidebar of the Framer workspace, find the Domains section. Your connected domain is listed directly beneath it, for example www.oma-kase.com. Click the domain itself. The word "Domains" above it is only a section label, not a button, so clicking that does nothing. The domain row is what opens the panel you need.
Step 2: Open the Files tab.
A panel opens showing tabs across the top: Overview, Files, and others (Multi Site, Headers, Redirects). Click "Files."
The Files tab description reads: "Upload Well-known files like robots.txt, security.txt, or llms.txt, or serve any static file on a fixed URL."
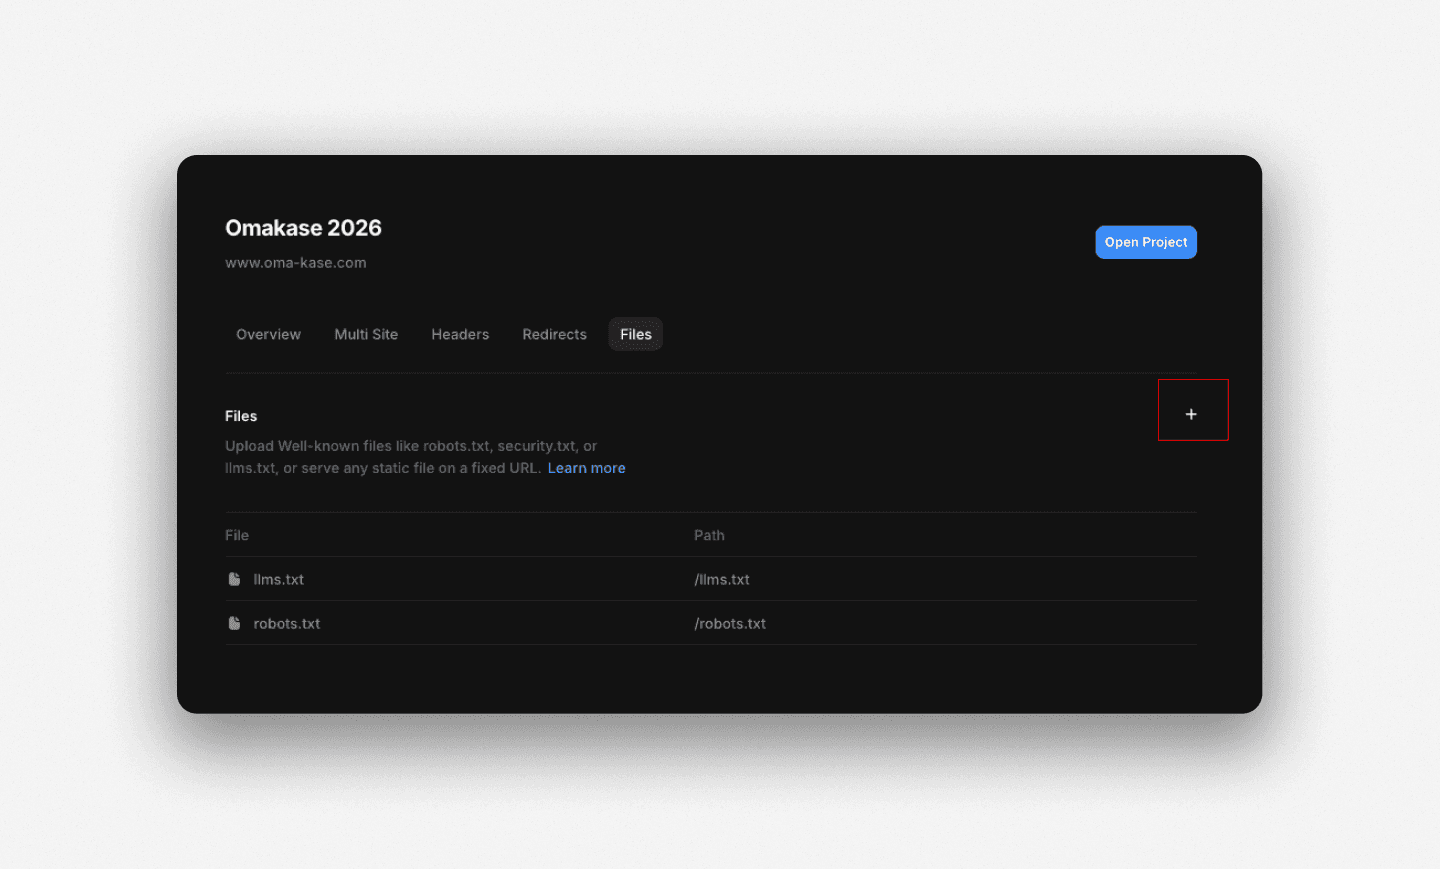
Step 3: Upload your llms.txt file.
Click the "+" button (or the upload button) in the Files tab. Select your llms.txt file from your local machine.
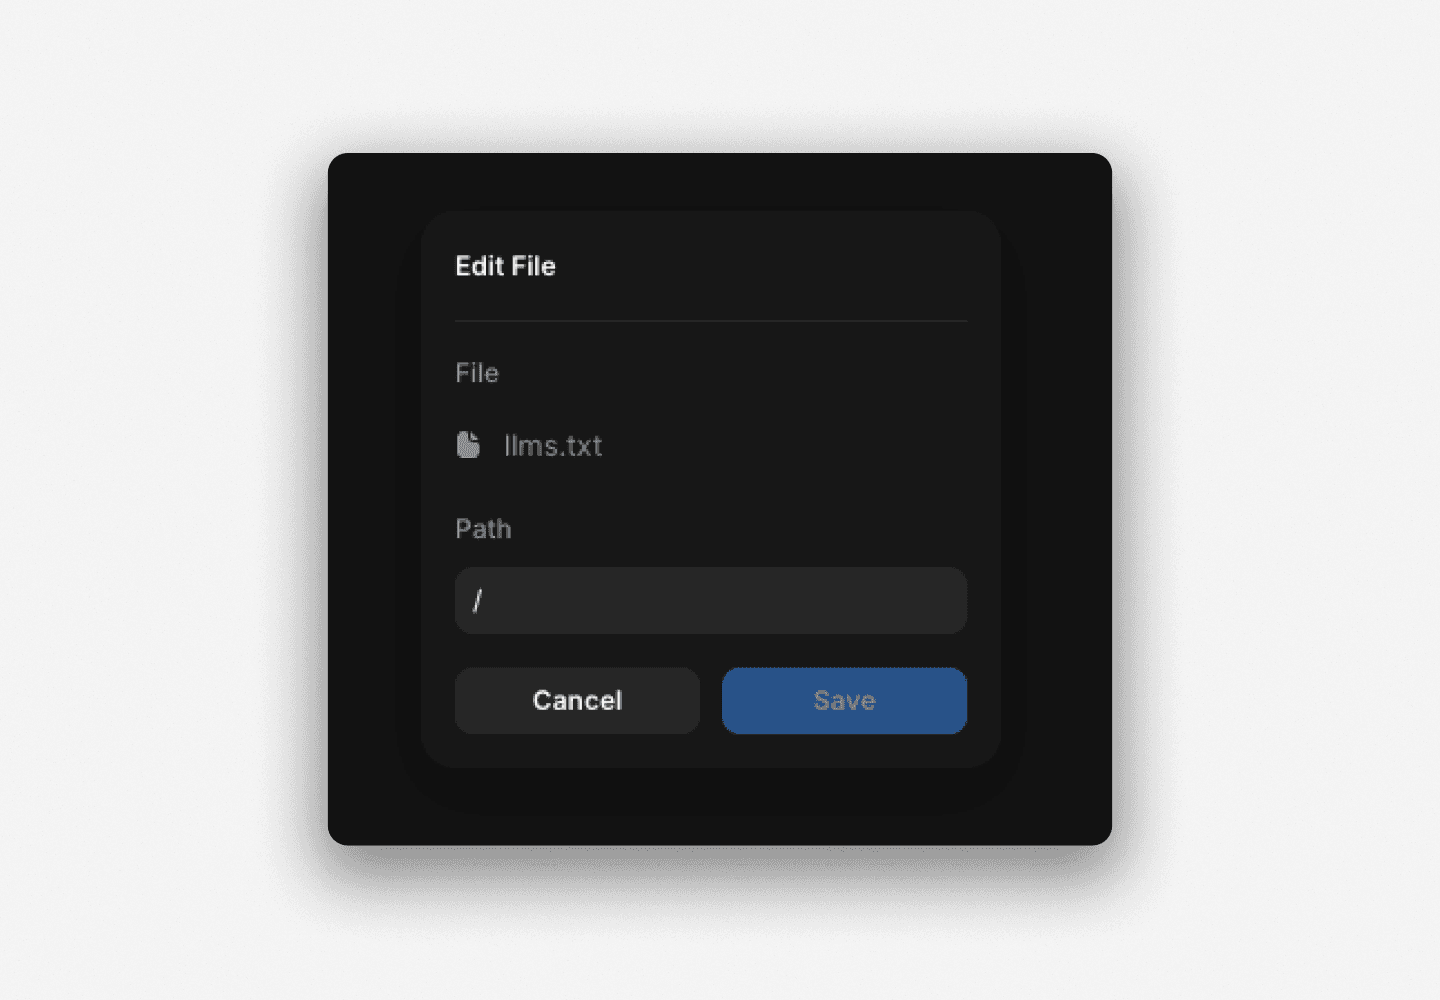
Step 4: Leave the path to Framer.
Once the file is added, Framer fills in the path for you, based on the file name. You do not need to type anything here. Leave the path field exactly as Framer sets it. A file named llms.txt is served at /llms.txt, the root path you want, and Framer handles that automatically.
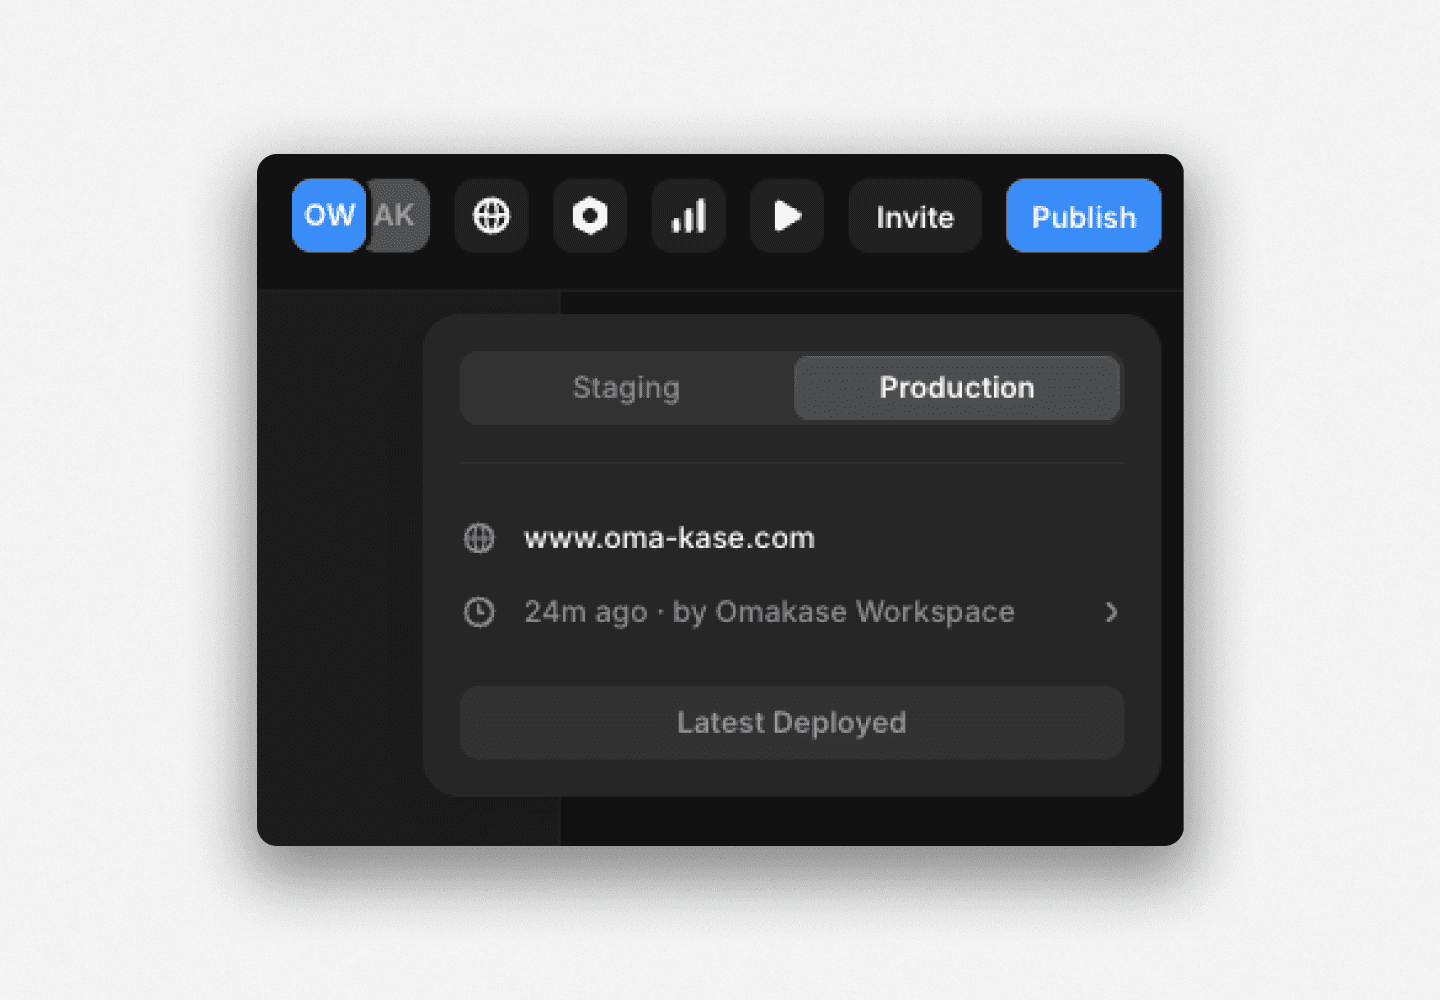
Step 5: Open your project and publish.
The file is not live until you publish, and there is no Publish button on the dashboard itself. Open the Framer project that the domain is connected to, then publish it from inside the project editor. After publishing, visit yourdomain.com/llms.txt in a browser to confirm the file is resolving.
What to Put Inside Your llms.txt File
Uploading an empty file does nothing. Here is what a useful llms.txt actually contains.
The llmstxt.org spec defines the format. At minimum, your file should include:
A short
# Titleline identifying your siteA brief description in plain text (one to three sentences)
A list of your most important pages with labels
A simple example for a Framer studio site:
What to include: your primary landing pages, key blog posts or guides, pricing, and any page where you want to be accurately represented in AI search results.
What to leave out: tag archives, pagination, admin pages, anything behind a login.
If you want to generate the file instead of writing it manually, there is a third-party LLM Text Generator plugin on the Framer Marketplace by Chris Lacorte that can scaffold the file from your existing site structure. It is not affiliated with Omakase. I have not run it myself, but it is the tool the Framer community points to when this question comes up.
How to Add a robots.txt File to Your Framer Site
The upload process is identical to llms.txt. Go to Domains, click your domain, open the Files tab, click "+", and upload your file. Framer sets the path to /robots.txt for you, exactly as it does for llms.txt, so there is nothing to type.
[IMAGE: The Files tab showing two uploaded files: /llms.txt and /robots.txt, both listed with their paths.]
That said, there is a genuine source of confusion here that is worth resolving before you upload anything.
Framer auto-generates a default robots.txt for every published site. The auto-generated version is minimal and generally permissive. You cannot edit that auto-generated file in place. For years, this led Framer's help docs (and many third-party guides) to say that robots.txt in Framer is "not directly editable."
What changed with Static Files: you can now upload your own robots.txt via the Files tab, and your version overrides the auto-generated default. The file you upload becomes the robots.txt your domain serves.
If you want to do things like explicitly allow AI crawlers (GPTBot, ClaudeBot, PerplexityBot, Google-Extended) or block specific bots like CCBot, you need a custom robots.txt. The technical SEO setup for Framer sites, including the full allowlist for AI crawlers, is covered in detail in my technical SEO checklist for Framer.
A minimal permissive robots.txt that opens your site to all AI crawlers looks like this:
After uploading, open your project, publish it, and verify at yourdomain.com/robots.txt.
FAQ
Do I need a paid Framer plan to add an llms.txt or robots.txt file?
Yes, uploading well-known files and static files is a paid-plan feature in Framer. The exact plan tiers listed in Framer's documentation vary by page: one help article says Pro, Scale, and Enterprise; another says Pro, Launch, Scale, and Enterprise. The safest approach is to check framer.com/pricing for what is currently included in your plan. The Files tab will not appear for domain configurations on free plans.
Does llms.txt replace robots.txt?
No. They are different files with different jobs. robots.txt controls which crawlers can access which parts of your site. llms.txt curates content for AI systems by giving them a structured list of your most important pages. You need both. One manages access; the other manages context.
Why does Framer say robots.txt can't be edited?
This is a documentation lag, not a product limitation. Framer auto-generates a default robots.txt for every published site, and that auto-generated file cannot be edited in place, though you can replace it entirely by uploading your own. What changed with Static Files (launched March 23, 2026): you upload your own robots.txt through the Files tab, and your file overrides the auto-generated default. Any guide that says robots.txt is "uneditable" in Framer is working from information that predates the Static Files launch.
How do I check that my llms.txt file is live?
After uploading the file in the Files tab, open your Framer project and publish it. Then open a browser and visit yourdomain.com/llms.txt (replace yourdomain.com with your actual domain). If the file is live, you will see the plain-text contents in the browser window. If you see a 404, confirm that you published the project after uploading and that the file is listed in the Files tab.
Where does Framer serve the file from?
Framer serves uploaded files from the root of your domain. A file named llms.txt is served at yourdomain.com/llms.txt, and a file named robots.txt at yourdomain.com/robots.txt. Framer sets that root path automatically when you upload. There is no subdirectory; both files land at root level, which is exactly where AI crawlers and bots expect to find them.
The Bottom Line
Both files now live in one screen. Go to Domains, click your domain, open the Files tab, and upload. Framer sets the path, and you publish from inside the project. The only real friction is confirming your plan includes the feature and remembering that the file goes live only once you publish the project.
Every guide that sends you to Project Settings or an SEO panel is describing an interface that no longer exists. The Files tab under Domains is the canonical workflow as of March 2026, and it handles llms.txt, robots.txt, and any other root-level file you want to serve.
If you are rebuilding your Framer site's technical foundation from scratch, our template library ships with clean site architecture and proper SEO structure already in place. Browse all templates at oma-kase.com/templates.